
When logged in with the appropriate privileges a new page can be created by clicking the + sign on the top right hand side of the page, or from the Page Management menu.
Pages may be created using a simple "WYSIWYG" HTML editor ('New Page with Standard Content Editor') or using a range of "content templates" that make it easier to create certain pre-defined layouts.
Note that a new page will by default be created as a child of the page being viewed when "+" is used, though this can be altered in several ways. Creating a page as a child of the root/home page serves to create a new top-level page.
The following guidance can be applied if 'New Page with Standard Content Editor' or 'Create From Template' is selected, though there may be additional settings on a page created from a template.
The following guidance describes the information to be recorded under the ‘Content’ tab.
Page heading
This is the heading and title of the page.
Meta Description
Meta descriptions are short texts that summarize the content of webpages to search engines. They are important for good "SEO" (Search Engine Optimization) and typically (but not always) appear within search engine results below the heading and address. The meta description should be no longer than 135–160 characters long. Any longer and search engines will chop the end off, so make sure any important keywords are nearer the front.
Content
This is where the main content of the page is created.
Tip: when copying and pasting text into the editor from Word, a PDF, or web page, first paste it into Notepad and remove any visible formatting (numbered lists, etc.). Then paste this into the content editor and add the desired formatting using the available tools.
Tip: for hyperlinks to other pages within your site, use relative URLs (like "/my-page") rather than absolute (like https://mysite.com/my-page). Only use absolute URLs for external links.
WYSIWYG and source editing mode (click to expand/collapse)
WYSIWYG and source editing mode
There are two viewing options for the content editor: WYSIWYG and source.
- The WYSIWYG editor is the default and opens when a new page is created. The editor has similar tools to MS word, for example bullet-pointed or numbered lists, hyperlinks and formatting.

- The source editor will allow you to view and edit the underlying html on the page.

It is possible to edit the content entirely through the source editor. This enables much greater control over layout and styling, however it takes more time and can be quite fragile. See our documentation page on Bootstrap styling for more information.
Tip: if you do use the source editor to create html you can validate it online using various tools like the W3C Markup Validation Service.
Embedding images in content (click to expand/collapse)
Embedding images in content
The most common method of embedding images in a webpage is to upload them to the website server and link to them from there. If your image is already uploaded onto the server then proceed to step 6 below.
Tip: prepare you images before you upload them by giving them an easily recognisable name and resizing them to the size you would like them to appear on the page.
-
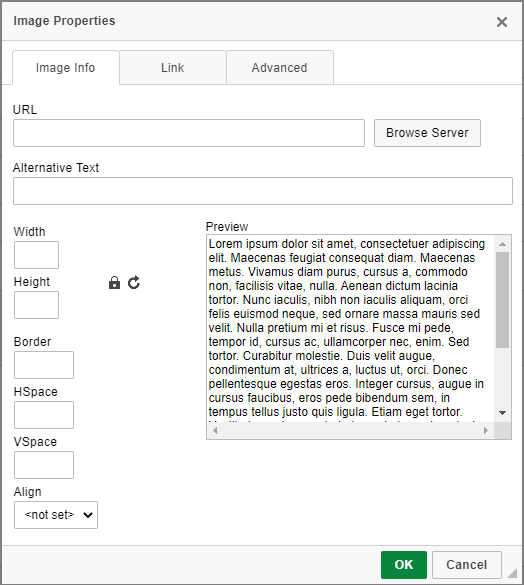
Click the ‘Image’ button in the WYSIWYG editor to open the ‘Image Properties’ pop-up.
-
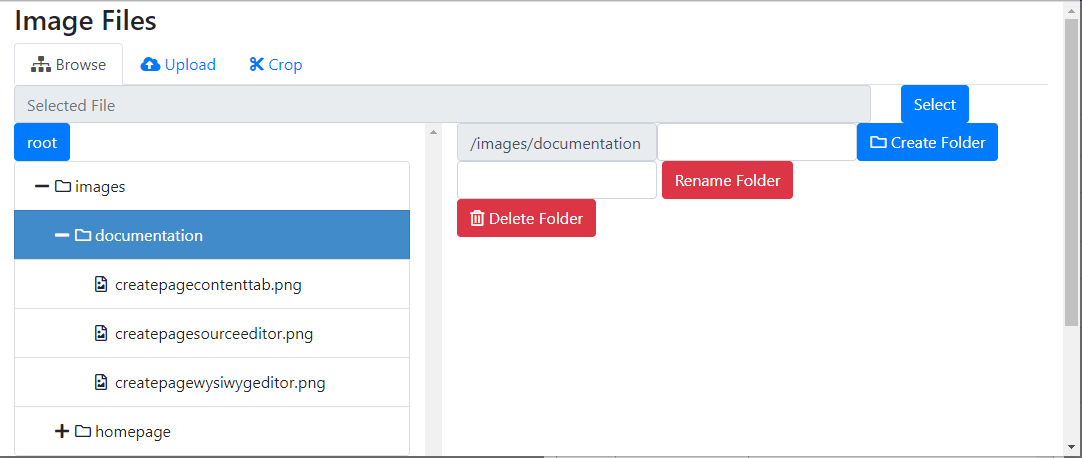
Click ‘Browser Server’ to open the website file manager.
-
In the website file manager, choose the folder you would like to upload the file to and then click the ‘Upload tab’.
-
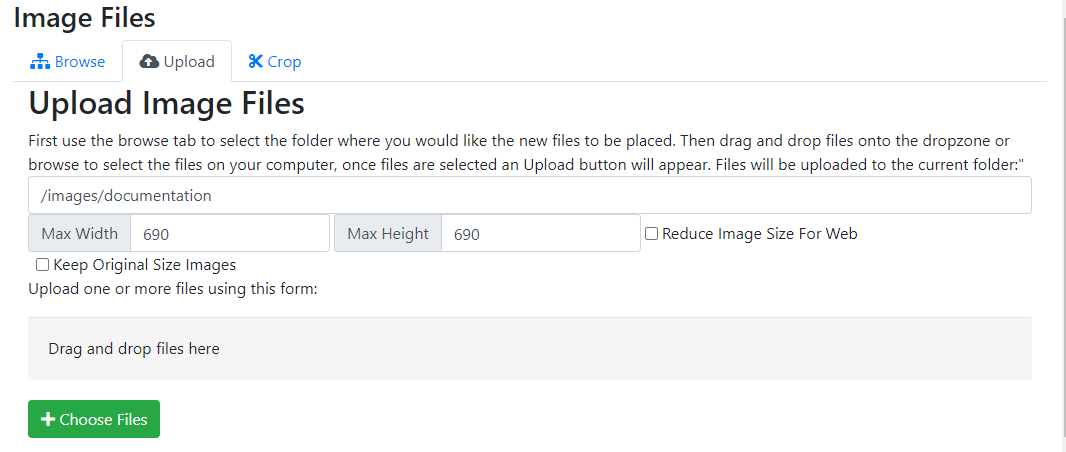
You may wish to untick the ‘Reduce Image Size For Web’ checkbox (especially if the images have been resized already).
-
Click ‘Choose Files’ to find the files on the local machine or drag and drop the image into the website file manager.
-
Go back to the ‘Browse’ tab and select the image to embed in the webpage.
-
Set the 'Alternative Text' for the image, which is important for accessibility. Alt text is a short written description of an image, which makes sense of that image when it can't be viewed for some reason.
-
The dimensions of the image can be changed in the ‘Image Properties’ pop-up. For example, if the image should be full-width set ‘Width’ at ‘100%’ and delete the ‘Height’ value. The best setting for images is the "img-fluid" class, which ensures that the image will resize responsively for different screen resolutions. This can be changed in the source editor. For example:
<img alt="Image Properties Pop-up" src="/images/documentation/createpageimageproperties.png" style="height: 670px; max-width: 600px;">Would become:
<img alt="Image Properties Pop-up" class="img-fluid" src="/images/documentation/createpageimageproperties.png">
Using "figure" elements for images (click to expand/collapse)
Using "figure" elements for images
The following is an example of an image added using the WYSIWYG editor:
<img alt="Image uploader in file manager" class="img-thumbnail" src="/images/documentation/createpageuploadimage.png" />
A better way of expressing this, which tells search engines a lot more and allows the mark-up to explicitly link the copyright statement/caption with the image, is as follows. This requires manual editing in the source editor:
 <figure>

<img alt="Image uploader in file manager" class="img-fluid" src="/images/documentation/createpageuploadimage.png" />

<figcaption>Image uploader in file manager © Emily Pennifold</figcaption>

</figure>
Which creates the following figure with associated caption:
Embedding media in content (click to expand/collapse)
Embedding media in content
It is possible to embed media like video into content pages, for example YouTube videos.
- Click the ‘Embed Media from External Sites’ button in the WYSIWYG editor to open the ‘Embed Media Content’ pop-up.
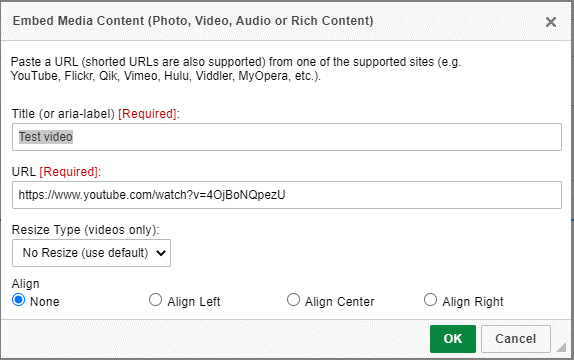
- Fill in the 'Title' field.
- Insert the URL of the media in the 'URL' field.
- Adjust the rest of the settings as required.
Embedding PDF documents in content (click to expand/collapse)
Embedding PDF documents in content
It is possible to embed PDF documents, or indeed other types of document/file, into content pages.
- First upload the document to a sensible location using the File Manager. You might create a folder for “documents”.
- In your content, make a hyperlink on some text, and set the target to the PDF/document. To find out the URL, if you work with the File Manager in a separate browser window, you can grab the relative address of the PDF by selecting the file in “Browse” mode in the File Manager, which then shows the address above, where you can select and copy it.
- It is best practice to make the hyperlink text descriptive of what will be opened, so hyperlink on "field recording form suitable for printing" rather than on "click here". You can also use the "Advisory Title" attribute of the hyperlink to give descriptive guidance such as "Click here to open a field recording form suitable for printing".
- For a really fancy result you could prepare a smallish image of the front page of the document, insert that image into your content, and make this image the hyperlink that accesses the PDF (with suitable guidance in a caption and advisory title to make it clear this is what to do).
- A PDF linked in this way should open in the user’s browser, or possibly a separate PDF reader, depending on their setup, and they will then be able to print it. Other document formats may be downloaded, if they cannot open in the browser.
Creating a table (click to expand/collapse)
Creating a table
It is simple to create a basic table using the 'Table' tool in the WYSIWYG editor. Be aware that tables should not be too wide as they do not behave as well on small screens. It is possible to make more stylish tables using Bootstrap classes.
Creating an anchor link (click to expand/collapse)
Creating an anchor link
Anchor links enable the user to jump directly to a marked section of a webpage. This can be very useful if the webpage is long.
- First select the section you would like to be able to jump to and set this as an anchor. Highlight the section and click the 'Anchor' button in the WYSIWYG editor (the image of a flag).
- Give the anchor a short recognisable name.
- Highlight the word(s) that will become a link to this anchor and click the 'Link' button (a chain link image) in the WYSIGWYG editor to open the 'Link' pop-up.
- In the 'Link Type' drop-down select 'Link to anchor in text'.
- Select the relevant anchor name from the dropdown in 'Select an anchor'.
Putting content into modal popups (click to expand/collapse)
Putting content into modal popups
Content can be presented in popups if desired, using Bootstrap "modal" elements; ("modal" means the user cannot do anything else until the popup is closed again). Here's the code for a little example, and I've put it in a popup!
Author
Automatically populates with the name of the user who created the page. This field is editable, but the value is not displayed on the page to end users.
Publishing options
| Publishing option | Description |
|---|---|
| Save draft | Click ‘save draft’ to save the page as draft to publish in the future. Anonymous users will not be able to see the page until it is published. |
| Publish now | Click ‘publish now’ to publish the page immediately. |
| Publish at date/time | It is possible to set the page to publish at a date/time in the future. This can be useful if you have a series of blogs or pages that you would like to be published weekly, or similar. |